
So its that time of the year, or maybe you are hosting themed party and want to display some awesome decorations. Well, the following how-to will provide you step-by-step instructions on how to create your very own Frankenstein wall-mounted decoration! This awesome project can be made in just one afternoon, and your supplies can all be found at your local Michael’s Arts and Crafts store.
Lets dive right in. Here’s the materials listing for today’s project:
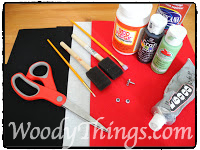
Materials
- Wooden square plaque (6″x6″)
- Sand paper
- 2 sponge brushes
- size 0 liner brush
- size 6 shader brush
- light green, black, and red acrylic paint
- Gloss Mod Podge
- Black, red, white stiff felt
- big googly eyes
- 2 screws (3/4″ long)
- frame hook
Step 1: The first thing you’re going to want to do is lightly sand the wooden square plaque on all sides. You’re going to do this because you will end up with a much smoother surface once your project is completely finished, and so that you do not get any splinters while working on it. Don’t forget to dust off any loose particles before you begin painting.

Step 2: With the sponge brush you’re going to apply the MEADOW GREEN acrylic paint on the raised flat side of the wooden square and you’re also going to want to paint half of each side of the wooden square (left, right) and also the entire bottom part. Let this dry completely (about 20 minutes) before you begin step 3.

Step 3: With the size 6 shader paint brush (flat/wide tip) paint the left, right and top half of Frankenstein’s head in BLACK. When that dries up, turn the wooden square over to the side that is still unfinished and paint the back of his head entirely in black.


Step 4: Once the black paint has completely dried, you will cover the entire wooden square with Mod Podge GLOSS. Mod Podge does dry clear.

Step 5: Take your stiff black felt and Cut a 2inch strip with a wavy pattern on one side. Spread some E6000 glue on one side with your finger and place it on the top of his head
Step 6: Use your red paint to draw the stitches on the upper left hand corner of Frankie’s face

Step 7: Place his googly eyes by dabbing on a little E6000 glue on the back of them and placing them on his face
Step 8: cut a thin strip of the black felt for his eye brows, spread a little E6000 glue on the back and place it over his eyes.
Related Content: DIY Moss Covered Vase
Step 9: cut a strip of red felt for the mouth

Step 10: cut a small square for the tooth with the white felt and then attach the screws on each side

Step 11: Turn Frankie over and attach the frame hook to the back of his head and voile, you’re done! That wasn’t so hard was it? Now go ahead and hang him up!

Please feel free to share your own creations with us, we’d love to see how yours turns out. Feel free to leave a comment below, via email, or reach out to us on social media!
If you’d prefer to custom order this Frankenstein decoration, check out our products page and order it online!
Thanks for stopping by.
#HappyCrafting!